Monday, February 28, 2011

Taza 60% Cocoa Bar:

One unique bean-to-bar chocolate maker that is headquartered in Somerville, MA – not far from where I lived when I was in grad school, is Taza Chocolate. They’re unique in that they use a stone-grinding method for their chocolate production, which reflects a traditional Mexican style instead of the European preparation methods that (usually and hopefully) result in super-smooth chocolate.

They offer many chocolates in varying cocoa percentages and also offer several discs with flavor enhancements. Though I’ve picked up several Taza products, I elected to start my tasting adventure with their 60% Cocoa Stone Ground Dark Chocolate Bar.

In addition to the stone grinding approach, a neat feature of this bar comes from the packaging, which informs the consumer that the beans are sourced from the Dominican Republic.

Knowing that the bar maker is closely associated with the sourcing of the beans they use in production, I was left to do more hands on research, and opened the wrapper. I was greeted with a very fruity aroma.

There is certainly a hint of cherry in the taste, as well as some coffee. But what about the texture resulting from stone-grinding? It’s very, very different from most fine, artisan chocolates, in that it is gritty, but it is not grainy; further, it’s obvious that high-quality cocoa butter is involved, as the bar is quite soft. As coarse bits of cocoa float throughout the bar, the flavor comes across even more intensely, and I can see the appeal of the stone-grinding approach even if I enjoy smooth chocolates myself.

Have you had stone-ground chocolate before?

Sunday, February 27, 2011

Cinnamon-Chocolate Panna Cotta and Florentine Cookies: Daring Bakers' Challenge

February is almost over. And with the close of each month, I bring to you yet another Daring Bakers’ Challenge post. This one isn’t too exciting, but does include two items. You see, the February 2011 Daring Bakers’ challenge was hosted by Mallory from A Sofa in the Kitchen. She chose to challenge everyone to make Panna Cotta from a Giada De Laurentiis recipe *and* Nestle Florentine Cookies.

Two recipes. No pressure. I started with the panna cotta.

Two layers? What? Well, you see, Mallory offered up TWO recipes. One plain and one chocolate, I, of course, had to try the chocolate recipe for the bottom layer.

Come on. Did you forget which blog you were reading? Here’s how the chocolate layer went down.

Chocolate Panna Cotta Ingredients

1/2 cup whole milk

1/2 tablespoon unflavored powdered gelatin

1 cup whipping cream

1/4 cup sugar

2 1/2 ounces bittersweet chocolate, chopped (Scharffen Berger 70% Cacao Bittersweet)

¼ teaspoon vanilla extract

Pour milk into a small bowl, sprinkle gelatin over the top, set aside for five minutes. Heat cream, sugar, and vanilla over medium heat, bring to a low boil. Add chocolate and whisk until melted, then whisk in the milk-gelatin mixture until uniform. Transfer to a 9-inch springform pan lined with parchment paper and wrapped in aluminum foil.

Allow this layer to chill at least eight hours before tackling the next layer, which I chose to turn into a cinnamon panna cotta by using Mallory’s plain panna cotta recipe.

Cinnamon Panna Cotta Ingredients
1/2 cup whole milk

1 1/2 teaspoons unflavored powdered gelatin

1 1/2 cups whipping cream

2 1/2 tablespoons honey

1 1/2 teaspoons granulated sugar

pinch of salt

1 1/2 tablespoons cinnamon

Pour the milk into a pot and sprinkle gelatin evenly and thinly over the milk; let stand for 5 minutes. Heat over medium heat until hot, but not boiling. Add cream, honey, sugar, and salt. Making sure the mixture doesn't boil, continue to heat and stir occasionally until the sugar and honey have dissolved. Remove from heat, stir in cinnamon. Chill slightly in refrigerator, whisking occasionally to ensure that the mixture does not solidify, then pour on top of chilled chocolate layer. Refrigerate six to eight hours.

So that’s nice and pretty, and the folks at the party I took it to enjoyed the flavor combination. But this is the Daring Bakers’ challenge, right? Where’s the baking?

Woah now. This was a two-part challenge, remember? Onto the Florentine cookies, to which I added a cinnamon kick because…because I could.

Cinnamon Florentine Cookie Ingredients

1/3 cup unsalted butter

1 cups quick oats

1/2 cup sugar

1/3 cup flour

1 1/2 tablespoons light corn syrup

1 ½ teaspoons molasses

4 tablespoons cream, divided

1/2 teaspoon vanilla extract

Pinch of salt

5 ounces dark chocolate

2 teaspoons cinnamon, divided

Mix the oats, sugar, flour, one teaspoon of cinnamon, and salt in a bowl, set aside. Mix corn syrup, molasses, two tablespoons of cream, and vanilla in another bowl, set aside. Melt butter in a medium saucepan, once melted, remove from heat and add liquid and dry mixtures. Mix well.

Drop tablespoon-size bits of dough onto a cookie sheet lined with parchment paper.

Since I baked these shortly before Valentine’s Day, I thought I would pipe these into hearts.

Regardless of the shape you choose, bake at 375°F for 6-8 minutes or until golden brown. Cool completely on cookie sheet.

So much for those cute hearts.

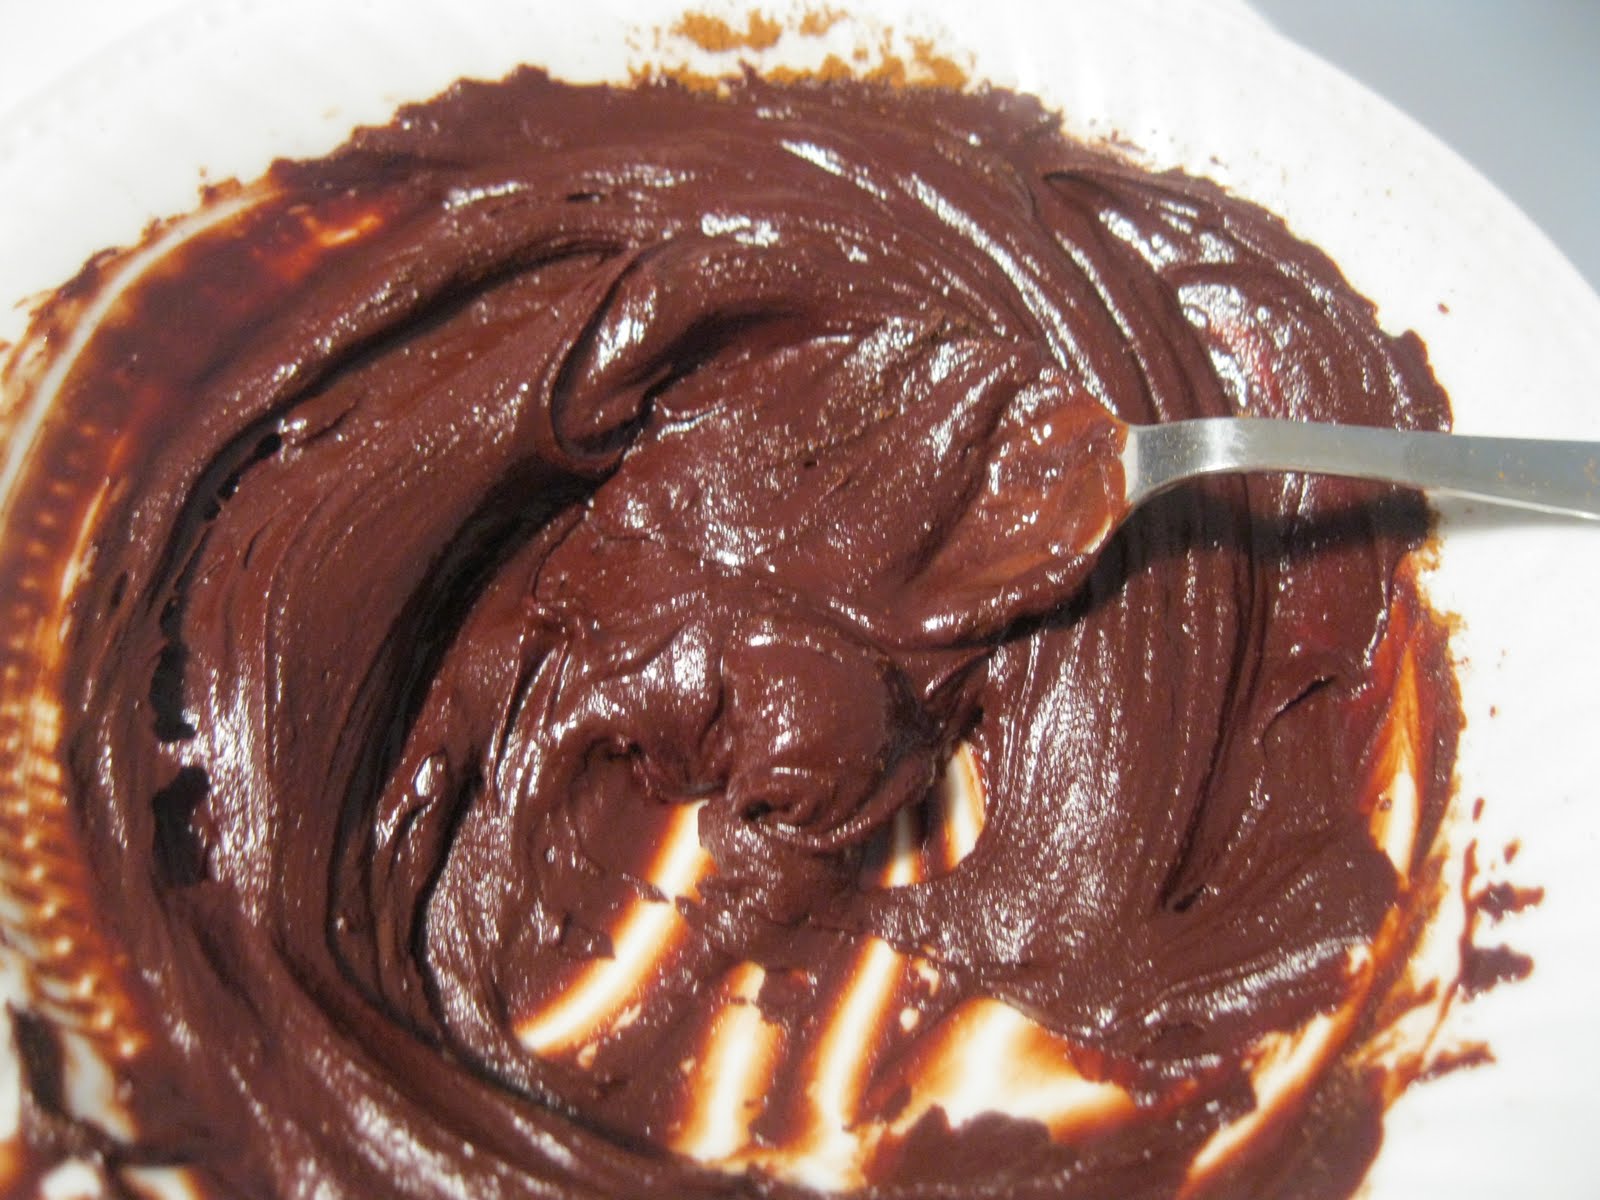
Luckily, I still had the ganache filling to tackle, the thoughts of which immediately lifted my spirits.

To make the ganache, heat the chocolate and remaining cream over low heat, stirring constantly, until chocolate is melted and mixture is smooth. Remove from heat, add remaining cinnamon. Allow to chill to room temperature, then spread ganache on half of the cookies.

Then sandwich them.

Cinnamon, chocolate, and cookies. Very nice. Even if not heart shaped.

Thanks for the two-part challenge, Mallory! Not too time consuming, and both new things for me.

Have you made panna cotta before?

Saturday, February 26, 2011

Mozart Balls: A Serious German Confection

When Leigh came and visited me, she really pulled out all the stops when providing me chocolate. Not only did she bring me white and milk mousse chocolate bars by Lindt, she also brought over a box of Mirabell Mozart Balls.

Mozart balls were evidently invented back in 1890 by Salzburg confectioner Paul Furst, and are named after, of course, composer Wolfgang Amadeus Mozart. The confection, which is actually Mozartkugel in German, involves chocolate, marzipan, and nougat.

Sign me up.

How does Mirabel do with this creation? Once I unwrapped it, I was greeted with a nutty smell that was reminiscent of high-quality peanut butter.

The chocolate shell out the outside is very soft, with nutty and vanilla flavors coming forward.

The interior offers three layers: A center of pistachio marzipan, a middle layer of praline, and a final layer of nougat. The very center is sweet, but not sickeningly so, and offers a hint of a fruity flavor. This center is just a tad dry and pasty, but the next layer, the praline, is much less sweet and is, in fact, quite nutty and smooth. The final layer inside the chocolate, the nougat, is sugary and nutty, but a tad grainy.

Since two of the layers are rich and two are a bit dry, and the layers have varying levels of sweetness, the best way to enjoy a Mozart Ball is to bite into the entire thing and enjoy it all together. That said, there aren’t many complex flavors; overall, it’s nutty, creamy, and sweet. I’d classify this as closer to a confection than a chocolate.

It’s a nice, sweet treat either way.

Have you tried Mozart Balls before?

Friday, February 25, 2011

Star Wars Cookies: I'm One Cool Sister

My brother’s birthday is today. Happy birthday, Doug!

Since he’s a big Star Wars fan, I bought him BOTH sets of the recently-released Williams Sonoma Star Wars cookie cutters.

Am I or am I not the best sister ever? But a really, really great sister would make cookies with those cookie cutters, too.

I’m a really, really great sister.

For the Darth Vader Cookies, I made Brownie Roll-Out Cookies.

I again used Gail’s “Between the Sheets” method to roll unchilled dough and subsequently freeze it. I cut out the cookies, and then kept the frozen until JUST before baking at 350° F for 15 minutes.

But why? To keep the shape of Vader’s beautiful face.

The other thing I did that I believe was important to my ultimate success in this project was humming the Imperial March during the entire process.

What? I live by myself. I have to take advantage of the perks.

Now onto the storm trooper cookies.

Since storm troopers are white, I needed a suitable white cookie. A non-chocolate cookie. I settled on Julie’s recipe for Maple Sugar Cookies.

I followed the same process as with the Vader cookies – keeping the cookies frozen until just before I put them in the oven.

Is that a formidable looking group or what?

The cookies have successfully arrived at my brother’s place in Cincinnati, and I trust that some of them have successfully been eaten.

Have you seen the Star Wars cookie cutters? Do you think you'll get them?

Thursday, February 24, 2011

Lindt Weiss: More Chocolate from Germany

One way you can tell that somebody a good friend is that they do all they can to ensure that you aren’t deprived of mousse-filled chocolate.

Obviously, Leigh is a good friend. When she came to visit, she brought me a Lindt Weiss Bar, which was a white chocolate bar filled with white chocolate mousse.

Hello, sugar.

For real.

The outer coating is quite smooth thanks to what seems to be some fairly high quality cocoa butter, and tastes like powdered sugar with a hint of vanilla – this is really, really sweet.

The mousse on the inside is light and fluffy, but is also just a tad waxy. Overall, each bite is sweet and buttery, with a flavor even less complex than that in the milk chocolate.

So if you like sugared butter, perhaps with a bit of extra cream, get this bar. If not, go for something else.

Do you enjoy very sugary chocolate?

Wednesday, February 23, 2011

Chocolate Chickpea Cake: Get some Extra Fiber

Once you spend enough time in the kitchen, you discover that some things almost always pair quite well together. Cinnamon and ginger. Tomatoes and cheese. Chocolate and chickpeas.

Wait what? Chocolate and chickpeas? How do those combine into anything edible?

Evidently, they can be combined to make a dense, deep chocolate cake.

I’d seen a few recipes for chickpea chocolate cake, and added it to my “someday” baking list. Then, I noticed that this week’s recipe linkup at Healthy Living Blogs, which I actually belong to (honestly), was for recipes featuring beans.

Well then. Time to make some cake. Chickpea cake. With chocolate.

Chocolate Chickpea Cake Ingredients (as adapted from Serious Eats)

4 ounces chopped bittersweet chocolate, melted and cooled to room temperature (Scharffen Berger 70% Cocoa Bittersweet)

1 (15-ounce) chickpeas, rinsed and drained with sinks removed

¾ c egg replacement (such as EggBeaters)

1/2 teaspoon vanilla extract

1/4 cup brown sugar

3 tablespoons sucralose (Splenda)

1/2 teaspoon baking powder

1/2 teaspoon salt

Line a 4”x8” loaf pan with parchment paper and spray with nonstick cooking spray. Puree beans, egg replacement, and vanilla in a food processor until smooth.

Doesn’t that, uh, not look like cake batter? It’s ok. Proceed by adding the sugar, baking powder and salt, blend until smooth. Then add the chocolate and blend until well-combined, stopping to scrape down the sides of the bowl several times to ensure that a uniform mixture is achieved. Pour batter into prepared loaf pan.

Now this is starting to look kind of like a normal cake. Bake at 350°F for 40-45 minutes, until a knife inserted into the center comes out clean. Allow to cool for 10 minutes, remove from pan by lifting edges of parchment paper, then slice.

Since this cake is made from nontraditional ingredients, it should be no surprise that it doesn’t taste like a traditional cake. That being said, it is dense and moist, and offers a deep chocolate flavor without being very sweet.

And if you slice this into 10 pieces, each piece has only 120 calories and 4.5 grams of fat. To boot, it also packs 2.5 grams of fiber.

A perfect recipe for healthy living with chocolate, no?

Have you ever made a bean-based cake? How did it turn out?

Tuesday, February 22, 2011

Lindt Feinherb: Chocolate from Germany

Back when Leigh came and visited me, we had quite the time. Not only did she graciously accept some of my macaron experiments, but she also brought me some chocolate straight from Germany. The haul included a bar of Lindt Feinherb, which is a milk chocolate mousse bar.

The exterior has a bit of a waxy feel, and has clear vanilla and cream tastes with a hint of a coffee undertone.

The interior mousse is very sweet, and is substantial enough to hold up to the exterior coating quite well. It’s fluffy and creamy, and I believe I could eat some of this on its own.

You know, the way people eat chocolate mousse on its own.

The chocolate flavor in this bar isn’t that complex, but the bar offers a creamy, sweet treat that I enjoyed, though it isn’t one of my favorite milk chocolate treats given the waxy nature of the coating.

Have you had mousse filled chocolates before?

Monday, February 21, 2011

Artisan Confections Caramel Hearts: Because It's OK to Eat Valentine's Chocolate Late

I have a fun fact for you: kids forget things. Often.

What does that have to do with chocolate? Well, one of my swimmers very kindly got me a box of caramel-filled hearts from Artisan Confections, which is based in nearby Arlington, VA.

And she even did this well in advance of Valentine’s Day! So why didn’t I include this in my review of chocolates to consider stocking up on for Valentine’s Day? Well, you see, buying and delivering are two separate processes. And practice is hectic. So I wound up ACTUALLY receiving these later last week.

It’s cool. You can give me chocolate anytime. Especially from Artisan Confections, which I enjoyed the last time I was given a gift of their chocolates. How did these caramels measure up?

The dominant aroma was coffee, with a fruity undertone. The shell is quite thin, features a smooth, bittersweet chocolate with little added sugar, and offers coffee and earthy notes.

The caramel inside is just a tad liquid for my personal tastes, but is substantial enough to not result in an uncontrolled mess. The taste of the caramel is a perfect combination of sweet and salty, and blends well with the chocolate shell from a flavor perspective, as the bittersweet chocolate matches well with the sugar in the caramel. There is a bit of crumbling, but it’s not severe enough to make this impossible to bite into. I certainly enjoyed this treat, and need to get myself over to Artisan Confections to procure more caramels.

Soon.

Do you think it’s OK to eat heart-shaped candy after Valentine’s Day?

Sunday, February 20, 2011

Red Velvet Macaron Bouquet: February MacTweets

As I mentioned yesterday, blog cooking groups are perfect for me because an actual in-person cooking group is difficult when most of your spare time comes when normal human beings are, like, sleeping. And given the fact that I’ve been obsessed with perfecting my macaron-making technique since I first made them just about four months ago, the MacTweets group is perfect for me. I joined up last month, and had such fun checking out everybody’s creations that I decided to take on this month’s MacTweets Mac Attack Challenge: Macs are in the Air, which challenged us all to make macarons in the spirit of Valentine’s Day.

Red velvet macarons it is. But just macarons? Is that enough? Not if you are insane. No, then you have to make a bouquet of macaron flowers.

And you know what’s cool about this bouquet? You can totally do this after Valentine’s Day. For any occasion. To replace flowers. Take note of this recipe. You might want to use it some day.

Because if some dude showed up at my door with a bouquet of macarons and truffles, it would be the best thing ever.

Actually, I’d probably call the police. Details. Anyway, the recipe.

Red Velvet Macaron Shell Ingredients (from Tartlette)

25 grams granulated sugar

3 egg whites

200 grams powdered sugar

110 grams blanched almonds

Red food coloring, as needed

To begin, grind the almonds and powdered sugar in a food processor until finely ground and a uniform mixture is achieved. Set aside. Whip the egg whites until foamy, then continue whipping while slowly adding the granulated sugar. Whip until the mixture is stiff, like shaving cream. Add food coloring until desired color is achieved, then carefully fold the meringue the almond-powdered sugar mixture in fewer than 50 strokes, taking care to scrape the bottom of the bowl on the strokes.

Now you may remember that I’ve previously had issues with going nutty with food coloring when making macarons. This time, it was intentional. These shells are, after all, for red velvet macarons.

Once you’ve made your stoplight-red batter, pipe it into rounds about 1 ½” in diameter on a baking sheet lined with parchment paper.

Let the piped rounds sit for 45 minutes, then bake at 280° F, for 20 minutes.

Feet! And pretty smooth tops. Can I brag for a minute? These shells were so good that when I took the finished product to a party, people asked me where I BOUGHT these guys.

Bought? Ha. I guess I’m getting better at this stuff.

After admiring my shells for a few minutes, I got to work on the red velvet filling.

Red Velvet Ganache Ingredients

4 ounces white chocolate, chopped (Callebaut 25.9% Cocoa White Chocolate)

2 ounces milk chocolate (Callebaut 33.6% Cocoa Milk Chocolate)

¼ cup heavy cream

Red food coloring, as needed

Heat the cream and chocolates over low heat until chocolate melts. Remove from heat and allow to cool to room temperature, stir in food coloring until ganache is bright red.

Spread ganache between macaron shells and sandwich to achieve your final product.

Now those are very nice, but I had decided to make a bouquet. I needed greenery.

Enter mint white chocolate truffles. They totally look like greenery. In an abstract way.

Mint White Chocolate Truffle Ingredients

12 oz white chocolate

1/4 cup crème de menthe

Heat the white chocolate over very low heat until melted, then add the crème de menthe and stir until smooth.

After the mixture cools to room temperature, roll into ¾” balls and affix to decorative sticks for presentation.

This recipe yields about three beautiful, edible bouquets. Or one very impressive bouquet. Remember this the next time you feel the need to get flowers for somebody. This is tastier.

Would you rather get flowers or a macaron bouquet as a gift?

Saturday, February 19, 2011

Matcha Sugar Cookie Brownies: We Should Cocoa February

Man do I love blog cooking groups. It’s like a supper club that you can participate in at 3 am. If that’s the only time you have available to cook. Because that’s normal.

Do you know what else I love? Finding new blog cooking groups that interest me. Daring Bakers is cool, but it’s only once a month. So when I found out about “We Should Cocoa,” my ears perked up.

At 2:30 am, which was when I was reading about it. That’s OK, though. It’s also normal to read chocolate blogs in the middle of the night.

OK, maybe doing those things between 2 and 4 am is not normal. But don’t hate me for it. Instead, hate me because you didn’t get to eat any of these Matcha Sugar Cookie Brownies.

See, the February 2011 challenge, hosted by Choclette, required participants to incorporate tea into their recipes. I contemplated what I wanted to do, and after seeing Chocolate Chip Cookie Brownies posted at Evil Shenanigans, I decided that a brownie topped with matcha cookie dough would be perfect.

Also, I hadn’t made brownies in months and it made me sad. But first, I had to whip up the matcha sugar cookie dough.

Matcha Sugar Cookie Dough Ingredients (as inspired by Kirbie’s Cravings)

1/3 cup butter

1/4 cup white sugar

1 egg yolk

½ teaspoon vanilla extract

1 cups all-purpose flour

1/2 teaspoons baking powder

1/4 teaspoon salt

1 1/2 tablespoons matcha tea, finely ground

Few drops green food coloring (optional)

Mix together the flour, baking powder, and salt, set aside. Cream butter and sugar until fluffy, then beat in egg yolk until incorporated. Add vanilla and tea, then mix in flour mixture on low speed until just incorporated. Add food coloring near the end of this process.

Allow this pretty green dough to sit in the refrigerator overnight so that the tea flavor mixes in more completely. The next day, it’s brownie time. Be sure to pull your cookie dough out of the refrigerator before you start so that it is at room temperature when it’s time to top the brownies.

Supernatural Brownie Base Ingredients (as adapted from Nick Malgieri’s Chocolate)

8 tablespoons butter

4 ounces bittersweet chocolate, chopped (Scharffen Berger 70% Cocoa Bittersweet)

2 eggs

1/4 teaspoon salt

1/2 cup dark brown sugar

1/2 cup granulated sugar

1 teaspoons vanilla extract

1/2 cup flour

Prepare an 8”x8” pan by lining with parchment paper and buttering the parchment paper, set aside. Melt the butter and chocolate over low heat, set aside and allow to cool until slightly warmer than room temperature. Beat eggs until fluffy, then add sugars and beat for approximately 3 minutes on medium speed. Add salt, vanilla, and chocolate mixture, beat until incorporated. Carefully fold in the flour until just incorporated; pour into the prepared pan.

Now it’s time to make this more than just brownies – as if brownies are ever JUST brownies. Crumble the sugar cookie dough over the brownie batter in fairly large chunks, press down into batter.

Bake for at 350° F for 40-45 minutes. Allow to cool completely before slicing (really).

You could really do this with any kind of sturdy cookie dough. And you should. But this time, I did matcha sugar cookie dough thanks to the challenge from Choclette, which was great fun.

Do you belong to any blog cooking groups?