Tuesday, August 31, 2010

Checking out Blommer Chicago: Chocolate-Covered Caramel Corn

Nearly a month after getting back from Chicago, I still haven’t even come close to writing about (or for that matter, tasting) most of the delicious chocolate treats I picked up there. So today, let’s talk about a true Chicago institution: Blommer.

Since the chocolate is processed onsite, the delicious chocolate aroma is apparent from blocks away. Evidently, some neighbors complain about this. Having lived right next door to a Tootsie Roll factory in Cambridge, MA, I don’t understand the objection to smelling chocolate, sugar, or other confectionary ingredients at all hours of the day and night. Better than most city smells.

Blommer is kind enough to operate a factory outlet on site, which sells bulk chocolate, non-chocolate candy, and chocolate-covered-anything-you-can-think-of. I had a hard time deciding what chocolate covered goodie I wanted most, and while I wanted to take many of the creations home, my luggage space was limited. I settled on a bag of chocolate-covered caramel corn, since it seemed unique.

That whole bag only set me back $3. Not a bad deal. Especially not for that smooth, creamy milk chocolate coating.

Inside, there is crisp popcorn covered in a sweet and salty caramel.

I was truly amazed by the way the caramel corn stayed nice and crispy with the chocolate coating. The contrasts in just one piece – crispy and smooth, sweet and salty – made this bag easy to finish off. Forget about making it back to DC, this chocolate covered caramel corn barely made it back to my hotel room. I should have picked up more, especially for the price.
Monday, August 30, 2010

Covering Mistakes with Chocolate: Buttercream-filled Chocolates

Remember the attempts I made at a meringue based buttercream? Remember how they were entirely unsuitable for use on my mini cupcakes? Did you wonder what I did with it? I, of course, did what any reasonable person would do.

Throw it out? Nope.

Eat it straight? Nah.

Cover it in chocolate? Of course.

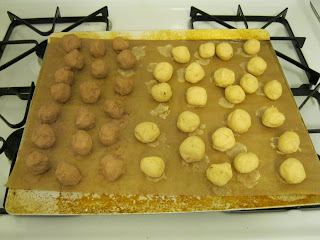
As tempting as it was to just take a slab of the buttercream and pour chocolate over it, I took a more refined approach by rolling the salty caramel buttercream and chocolate buttercream into 1 inch balls.

I stuck them in the refrigerator that that they could stand up to the heat of melted chocolate, and melted about 24 ounces of El Rey 41% Cocoa Caoba in the meantime.

To make the dipping easier, I stuck toothpicks in each of the buttercream balls.

I dipped each ball in the chocolate individually, and then removed the toothpicks.
Looks yummy, doesn’t it? Believe me, they taste(d) even better.

Sunday, August 29, 2010

Yogi Berry: Another Way to Cool off on a DC August Day

I don’t remember when frozen yogurt became a sexy national trend again. Perhaps it was a few years ago. This time around, the trend has apparently been centered about tart frozen yogurts. In DC, there is one such shop, Yogiberry, that is locally-owned and operated. One of their shops is near me on Connecticut Avenue, and since they carry a chocolate flavor, and since the heat is creeping back up in DC after a brief respite last week, today seemed like a great day to check them out.

In addition to chocolate frozen yogurt, they also offered several chocolate toppings, including a cocoa sauce that looked like it was complimentary, but I went with a simple dish of chocolate frozen yogurt to get a good sense of what it was like.

This “five ounce” dish that looked more like 6-7 ounces set me back $2.95 was the smallest portion offered. However, since the yogurt was light and fluffy, this wasn’t as overwhelming as it would have been if I’d gotten some ultra-dense gelato or ice cream. The texture, in addition to being light, wasn’t icy, though when melting it seemed a tad more watery than creamy. The chocolate flavor was noticeable and seemed natural rather than artificial, but it wasn’t strong enough to last more than a split second. The amount of sugar incorporated into the treat was just about right, but I could have used a stronger chocolate flavor. Still, at 25 calories an ounce, this is a pretty nice deal for a summertime treat.

Summary

Yogi Berry: Another place to grab a cool treat on a hot August day in DC.

Pros: Smooth texture, not too sweet.

Cons: A little watery and not too chocolatey. The cocoa syrup could help.

Price: $2.95 for “five ounces” that looks like more.

Saturday, August 28, 2010

Celebrating Another Year: Mini Cupcake Extravaganza

Have you been wondering why on earth I’ve been going batty with the mini cupcakes and the buttercream frosting? Well, Thursday (8/26) happened to be my birthday, so I put together this set of mini cupcakes to hand out to all sorts of people.


1. Chocolate cake with dark chocolate frosting

2. Chocolate cake with salty butter caramel frosting

3. Salty butter caramel cake with salty butter caramel frosting

4. Salty butter caramel cake with dark chocolate frosting

There were over 180 mini cupcakes in all – what an experience! I took these up to New Jersey and Pennsylvania, to share with the folks on that outstanding work project with me, and also into my office in DC once I got back. They’re all gone now, but it made it possible for me to celebrate my birthday in the best possible way – with lots and lots of chocolate.

Friday, August 27, 2010

Classic Chocolate Buttercream Frosting: Milk or Dark?

After successfully making the salted butter caramel buttercream from yesterday’s post, it was necessary (yes, necessary) to follow up with a chocolate buttercream. I was torn between milk chocolate and dark chocolate, so I did the completely reasonable thing and made both.

I started out with the same buttercream base as I did in yesterday’s post, again leaving out the last cup of powdered sugar and the last half of the heavy cream to allow for texture adjustment at the end.

I divided the recipe in half, and for the first half, chopped up six ounces of milk chocolate (El Rey Caoba 41% cocoa).

For the other half, I chopped up five ounces of semi-sweet chocolate (El Rey Mijao 61% cocoa). I used a bit less because the flavor is more intense.

I melted each chocolate separately and incorporated them into their respective reserved buttercream, and adjusted the textures with the remaining powdered sugar and cream. The milk chocolate version barely needed any more cream or powdered sugar, while the dark chocolate needed it all, plus all the remaining powdered sugar. After a taste test, I decided that the milk chocolate version had a pleasing texture but just didn’t have enough chocolate flavor, so the dark chocolate version wins.

It looks and tastes more chocolaty, so for this mini-cupcake project, I’ll go with that version. The milk chocolate buttercream frosting will, uh, somehow get eaten.

Thursday, August 26, 2010

Salty Caramel Buttercream Frosting: Delicious Success

After experimenting with a new buttercream frosting recipe and finding that it made a delicious and fluffy frosting that would be perfect for a cake during cooler months, I went back to the familiar recipe that I’ve been making for over two decades. I learned the basics of this recipe from my mom, and it is loosely base on the Wilton buttercream frosting recipe, so it is perfect for holding shape after piping and can usually stand up to relatively extreme conditions – such as an August day in DC. I’ve made a few modifications to that base recipe, though. Namely, I swapped out the skim milk my mother used for heavy cream, and replaced the shortening with butter, because butter is just that delicious. I also added a bit of salt to contrast the sweetness.

Today’s buttercream creation is take two of the salty caramel buttercream. This recipe incorporates caramelized white chocolate (the stuff is amazing) and salted butter caramel sauce into my time-tested buttercream frosting recipe.

Ingredients (for one batch)

1 cup very soft butter

4 cups powdered sugar

½ cup heavy cream

1 teaspoon salt

1 teaspoon vanilla

½ cup salted butter caramel (as made for the salted caramel mini-cupcakes), heated until soft

3 ounces caramelized white chocolate, heated until soft

Start out with your butter and powdered sugar.

Whip the butter until fluffy, then add the powdered sugar half a cup at a time, setting aside the last two additions to give you flexibility in the final frosting texture. Then, get the cream, vanilla, and salt.

Add the salt and vanilla, and half the cream – again, to allow for texture adjustment at the end. The buttercream base is about done.

Now, on to make this a salty caramel buttercream by taking out the heated caramelized white chocolate and heated salted butter caramel.

Mix this into the buttercream base, and then refrigerate it for about 30 minutes, stirring every five minutes, to let it cool off so that it could be whipped up to the proper consistency. Even though neither the white chocolate nor the caramel should be that hot, the frosting will still be well above room temperature and will need to cool before you can perfect the texture.

Once that is accomplish, add the remaining powdered sugar and cream in small increments until the perfect fluffy texture is reached.

This stuff will hold up well on cupcakes, even on a standard DC August day. It also has a salty punch to go along with the sweet caramel flavor.

Wednesday, August 25, 2010

Buttercream Experimentation: Dark Chocolate

In yesterday’s post, I described the semi-successful buttercream experiment that resulted in a recipe best reserved for DC’s cooler days. I tried to repeat this experiment, but with a chocolate ganache base instead. My hope was that the chocolate might firm up the frosting a bit. For the ganache, I used El Rey 61% cocoa Mijao chocolate, along with heavy whipping cream.

If you did a full batch of buttercream using this recipe, you would heat a cup of cream and 12 ounces of semi-sweet chocolate over low heat to make the ganache.

After heating the ganache and letting it cool, I always like to fluff it up a bit.

Now it was time to pull out the fancy-pants meringue-based buttercream.

I blended it with the whipped ganache, and still found a delicious icing that simply wouldn’t do on a typical August day in DC.

This is even after adding the emergency cup of powdered sugar. Again, back to the kitchen, but I at least came away with a great recipe for a fluffy frosting for a cake come fall. Perhaps this would go well on a spicy pumpkin cake. Summertime cupcakes, not so much.

Time to go back to the tried-and-true buttercream recipe. I have a mini-cupcake project to tackle, and the clock is ticking.

Tuesday, August 24, 2010

Using Caramelized White Chocolate: Salty Caramel Buttercream Frosting Experiment

Since I didn’t use all the caramelized white chocolate in the salty caramel mini-cupcakes, I needed another recipe. And cupcakes need frosting. The logical thing to do was use the remaining caramelized white chocolate to make some frosting.

Normally, I go with the standard buttercream recipe I grew up with, and tweak it from there if I want to do something flavored. But in reading around several recipe blogs, I found a recipe for “real” buttercream that asserted that my childhood-memory based recipe was not the best. This recipe seemed to have a bit of a meringue base, and I figured it was worth a try, with a few of my own modifications. I made a quarter batch, but if you made a full batch, here’s what you’d need.

Ingredients

1 pound unsalted butter, soft and cut into small pieces

1 cup sugar

¼ cup water

5 egg whites

¼ teaspoon cream of tartar

1 cup of salted butter caramel sauce**

1 cup heavy cream

12 oz caramelized white chocolate

2 cups powdered sugar*

*added on an improvisational basis

**See description on making the caramel sauce in this post.

First, start out with the water and ¾ cup of the sugar.

Heat until the sugar is melted.

Once it’s melted, keep heating it, and pull out your egg whites and cream of tartar.

It’s time to make meringue. Whip up the egg whites until frothy, then add the cream of tartar, and gradually add the remaining ¼ cup of sugar.

By now, your sugar should have reached firm ball stage, which is where you want it. Slowly add it to the egg mixture while running the mixer on medium. After it’s all mixed in, pull out your butter.

Slowly add the butter, piece by piece, with the mixer continuously running on medium. You’ll wind up with something that looks like this when you are done.

Please do not lick the screen. Wait until after we add the caramel ingredients. First, we mix in the salted butter caramel sauce.

Next, take the cream and caramelized white chocolate.

Combine the cream and caramelized white chocolate over low heat until the chocolate is melted, allow it to cool slightly, and then whisk this in. It is now time to realize that this buttercream is too runny to stand up to the heat of a DC August day, and pull out the emergency powdered sugar to remedy the situation and get something that looks like this.

I stopped adding more powdered sugar, because it was already becoming a little sweeter than I wanted it to be. I was left with a tasty concoction that still wouldn’t be suitable for topping cupcakes in the unrelenting DC August heat, so I need to go back to the kitchen for this project. I was, however, pleased to have found a very nice recipe that would work very nicely on a cake.

In October, of course.


Monday, August 23, 2010

More Mini-Cupcakes: Now with Dark Chocolate

After using some of the caramelized white chocolate to make the salted caramel mini-cupcakes, I decided that I needed some dark chocolate mini-cupcakes to compliment them. I pulled out Nick Malgieri’s Chocolate, and adapted his recipe for Grand-Maman’s Chocolate Cake, which he says is “one of the simple desserts almost everyone prepares at home” in France. I made a triple batch – and this is because many people will be enjoying this mini-cupcake collection, not because I have a mini-cupcake addiction – but if you made a single batch, here’s what you’d need.

Ingredients

3 eggs

3/4 cup sugar

8 tablespoons of very soft butter

4.5 oz chopped semi sweet chocolate (I used El Rey 61% Cocoa Mijao

3/4 cup flour

After pre-heating the oven to 350 F and preparing the mini-cupcake pan with liners, take out the best ingredient: the chocolate, of course.

Melt it over very low heat, and set aside to cool. Then, get your eggs and sugar.

Whip them together for 4-5 minutes at medium speed until fluffy. Pull out the butter that you, of course, remembered to soften hours ago.

Whip in the butter until it is completely mixed in. Add the previously melted chocolate until mixed. Get the flour ready for some folding action.

Carefully fold in the flour by hand, being diligent against over-stirring, and stop when it is just incorporated.

Take the batter, pour it into the mini-cupcake liners until they are about ¾ full, and let them bake for 15-17 minutes.

They came out just a tiny bit dry, but the dark chocolate flavor comes through quite well. These will be perfect for the rich buttercream icing that I’ll be whipping up soon.

Sunday, August 22, 2010

Using Caramelized White Chocolate: Salty Caramel Cupcakes

Last week, I caramelized some white chocolate, and promised that I would use it. Use it in a recipe, and not eat it all. I’m sure that some were skeptical, but today, I present you photographic evidence that it was used in a recipe; specifically, I used it to make salty caramel mini-cupcakes.

Ingredients

1 1/2 cups all purpose flour

1 tsp baking powder

1/2 tsp salt

6 tbsp butter, softened

1/4 cup sugar

¾ cup caramel sauce*

2 large eggs

4 ounces caramelized white chocolate, melted

1 tsp vanilla extract

¾ c cream

*In order to have time for the caramel sauce to set, you need to make that first, so here’s how it goes:

Ingredients

1.5 c sugar

½ cup butter

½ cup cream

1.5 tsp salt

Heat the sugar in a heavy-duty pot until just melted. Slowly add the butter, then the cream, and finally the salt, all while stirring the mixture.

You’ll have more than ¾ cup, but I am sure you can find another use for it. For reference, eating it straight up is a perfectly acceptable use of the leftovers.

Now that we have the caramel sauce slowly cooling off, we can get to work on the cupcakes. Pre-heat the oven to 325 F, and set out the cupcake liners in a mini-cupcake pan. Then it’s time to get down to business with your dry ingredients (flour, baking powder and salt).

Wisk those guys together, and set them aside, and also set aside the measured cream, as this gets incorporated at the same time. Meanwhile, get to work with your other ingredients – the butter, sugar, eggs, and the caramel sauce, which should be cooled down by now.

Cream the butter and sugar until light, then beat in the eggs one at a time. As you do this, heat up the caramelized while chocolate over low heat until slightly softened, and get your vanilla ready, too.

Once the eggs are incorporated, add the caramelized white chocolate and vanilla. You now have a delicious-looking mixture of sugar and fat.

Sounds yummy, right? Take this mixture, and, in three additions, adding in the cream and the flour mixture alternately. Stir until the flour is just barely incorporated to avoid overmixing.

Take the completed batter and distribute it into the mini-cupcake liners so that the liners are each about ¾ full.

Toss the pan in the oven (ok, don’t really throw it) for 13-15 minutes, and find yourself greeted with a wonderful caramel aroma.

The mini-cupcakes tasted buttery and just a little salty; the caramel flavor was fairly subtle. The texture was rich and overall, just amazing. I give credit to the caramelized white chocolate for the richness.

Saturday, August 21, 2010

Dolcezza: Valrhona Chocolate Delivered via Gelato

It’s August.

I’m in DC.

Do you know what happens in August in DC?

For one thing, Congress, and most of their staff, run away on vacation. They do this because of one very notable aspect of DC life in August: It’s usually hot. And humid. I don’t mean hot and humid in the sense that you get sweaty if you go running in the afternoon. I mean hot and humid in the sense that in a three-block walk from the Metro to your office at 7 am, the air sticks to you. The good news? A typical August day in DC is a perfect day for enjoying frozen treats. Enter Dolcezza Artisanal Gelato.

I stopped by their Georgetown shop today in hopes that they had a specific chocolate flavor in stock. You see, the folks at Dolcezza take great pride in using the best ingredients in their hand-made gelato. Their chocolate is no exception, and they regularly have a Valrhona Chocolate Amargo. I was in luck today, and ordered the kid’s portion for $3.65.

I love the size of this treat – and found out that the gelato was so dense that it still took me 10 minutes to eat it. This is not a bad thing, as it melted at the perfect tempo to accommodate this, and it allowed me to savor every last drop. And was there ever a lot to savor: the texture was creamy (though just a tad gummy), the intensity of the dark Valrhona chocolate shined through and lingered after a bite was finished, and there was just the right amount of sweetness to cut the bitterness of the chocolate without overpowering it. I knew that anything made with Valrhona would have an outstanding chocolate flavor, but the folks at Dolcezza have worked it into a truly wonderful creation.

Summary

Dolcezza: Great gelato shop that offers a tiny portion size and several chocolate flavors, including at least one Valrhona-based flavor.

Pros: Wonderful blend of intense dark chocolate and sweetness, melts nicely.

Cons: Very slight gumminess to the texture. A little expensive for about four ounces, but I don’t think I could eat more in one sitting, and it’s worth noting that this shop uses the best ingredients around (Exhibit A: Valrhona chocolate).

Price: $3.65 for a kid’s portion, which is roughly four ounces.

Friday, August 20, 2010

Pineapple and Chocolate: Marriage by Cookie, Take 2

As I mentioned yesterday, I’ve had dried pineapple and dark chocolate on the brain for a few weeks. The recipe given in that post was one way I tried to bring them together in cookie form, and today, there’s another attempt. Today’s creation starts with my basic “mix-in” recipe, and simply incorporates dark chocolate chunks and dried pineapple directly. In order to cut back on the number of cookies I had sitting around, I also only made a half batch of this recipe, but if you made a full recipe, it would look like this:

Ingredients

1 cup butter, softened

¾ cup dark brown sugar

¾ cup white sugar

1 egg

1 teaspoon vanilla

½ teaspoon salt

2 ¼ cups flour

8 ounces dried pineapple

10 ounces semi-sweet chocolate chunks (El Rey 61% Cacao Mijao)

Per standard operating procedure, I creamed together the butter, sugars, and egg, and then added the vanilla and salt before slowly stirring in the flour. Then it was time for the delicious-looking mix-ins.

Once the mix-ins (that I didn’t snack on) were added, the dough was looking pretty appetizing.

I rolled the dough (that I didn’t snack on) into 1/2 inch balls. Usually, I make bigger cookies, but I was going to be asking people to compare this cookie to the one from yesterday’s post, and figured that making them bite-size would improve my chances of getting several individuals to assist.

These guys were baked at 375° F for 9 minutes, and came out with a wonderful chocolate aroma.

Maybe it’s because I have the mix-in recipe down so well, but I think I like this version of dark chocolate-dried pineapple cookies better. We’ll see what the other taste-testers have to say.